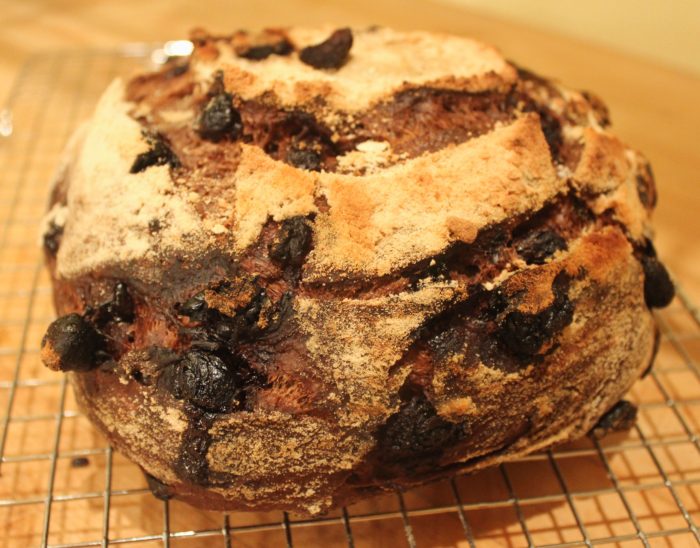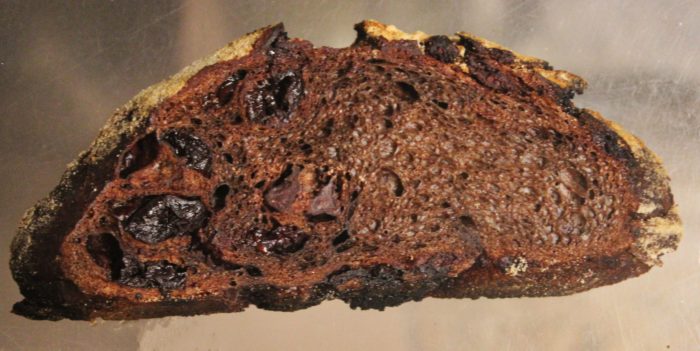

When The New York Times printed this recipe from Modernist Bread, bakers around the planet responded. Suzi was one of the first. She has a sourdough starter that is almost 30 years old, so she was quite prepared for this undertaking. Some sourdough starter is an ingredient here, so you’ll need to take that step a few days before you attempt this bread — 30 years is NOT required.
But, it is true that your bread dough here needs to proof for at least 15 hours. Want this for breakfast? Start the day before.
I am a chocolate purist. I don’t mix chocolate and fruit. Except here. The amalgam of sourdough flavor plus cocoa plus dried cherries is this perfect mix. I eat this bread by the slice. No butter, no jam, no honey. Just the bread.
It’s perfect. Beautiful and perfect.
Chocolate-Cherry Sourdough Bread
Yield: 1 loaf
Ingredients:
- 1 heaped teaspoon/8 grams instant dry yeast
- ¾ cup/185 grams warm water
- 1 cup plus 1 tablespoon/230 grams liquid sourdough starter
- 1 ⅔ cups/225 grams bread flour, plus extra for dusting
- ¼ cup/30 grams cocoa powder
- 1 tablespoon/15 grams espresso or very strongly brewed coffee
- 1 ⅛ teaspoon/7 grams fine salt
- Canola oil (or other neutral oil), for greasing
- 1 cup/160 grams dark chocolate chips
- 1 generous cup/160 grams dried cherries
Preparation:
In a wide mixing bowl, whisk together the yeast and water and allow the yeast to bloom, about 1 minute. Whisk the sourdough starter into the mixture until dissolved, then add the flour, cocoa powder and coffee. Use a dough scraper to stir the ingredients into a shaggy mass. Cover with plastic wrap and set aside for 20 minutes, then add the salt, incorporating it well. Transfer to a lightly oiled plastic container and cover with plastic wrap; it will be sticky.
Rest dough for 30 minutes, then lightly oil hands to fold: Pull one edge of the dough up and press it down into the center of the ball; repeat with the 3 other edges of the dough, then cover the dough. In 30 minutes, repeat the folding, this time incorporating the chocolate chips and cherries. Repeat the folding every half-hour, for a total of 6 folds. Check for gluten development: Pinch a piece of dough between your fingers and stretch it. It should stretch out to a thin, transparent membrane before tearing. If not, repeat folding and check again.
Turn the bread out onto a lightly floured surface and use hands to gently tuck the edges up toward the center of the dough, then flip the dough over so it’s seam-side down, and gently round with your hands. Cover with plastic wrap and rest dough for 20 minutes, then tuck edges down toward the seam, to shape dough into a tighter ball. Cover with plastic wrap and rest for 10 minutes. Transfer to a flour-dusted wicker breadbasket, seam side up, pinching the seam shut if necessary. Wrap basket with plastic wrap, or slide the basket into a clean plastic bag, closing it. Proof at about 55 degrees, or in the refrigerator, for 14 to 16 hours, until the dough has increased in size, and springs back slightly to the touch.
When you’re ready to bake, remove the dough from the refrigerator and transfer it, smooth side up, to a large cast-iron pot (with a lid) lined with a round of parchment paper. Be careful not to over-handle dough and lose air bubbles. Cover and bring to room temperature for 1 to 2 hours. Position a baking rack in the center of the oven and heat to 500 degrees. Using a razor or fine, sharp knife blade, score a cross on the top of the dough, making a fast, clean cut about 1/8- to 1/4-inch deep.
Bake covered for 33 minutes. Remove lid and bake for another 10 minutes, cracking open the oven door for the last 5 minutes. Push a thermometer into the bread dough; it should read 195 to 200 degrees for cooked bread. Transfer bread to a cooling rack, carefully remove the paper, and allow to cool completely at room temperature before cutting open.
Source: The New York Times taken from Modernist Bread by Franciso Migoya and Nathan Myhrvold
Photo Information [Top]: Canon T2i, EFS 60mm Macro Lens, F/3.5 for 1/30th second at ISO‑1250
Photo Information [Top]: Canon T2i, EFS 60mm Macro Lens, F/5 for 1/50th second at ISO‑3200

2.54
I’m puzzled; according to my research 8g of dry yeast = 2.54 tsp., not “1 heaping teaspoon”; I generally weigh my ingredient. A packed of dry yeast = 7g so I add an additional 1 gram. But the recipe implies that a heaping tsp is equivalent to 8 g. I don’t think so! Which should I use: a heaping tsp or 8g?
Go with the heaping teaspoon. Really heaping. That’s what we did.
Thank you. Did you then follow up by using volume, rather than weight, for the remaining ingredients?
We weight everything!