Earlier today I posted a review of Butter Baked Goods by Rosie Daykin. I don’t know how I overlooked this book published five years ago. But I discovered my copy and now I am baking and frosting away.
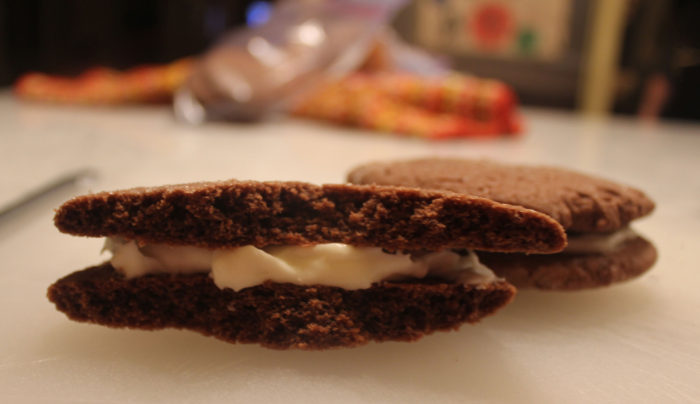
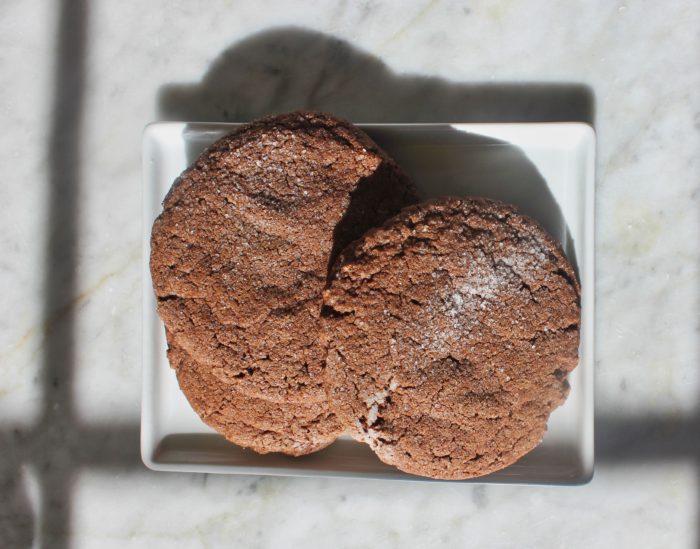
Rosie’s Vancouver bakery is famous for decadent use of butter and her oversized cookies. This is her interpretation of Oreos and they are about 3 inches across. You don’t have to make them into sandwich cookies, by the way. The simple cocoa wafers are a delight unto themselves. Crunchy on the outside and soft in the middle, they are the perfect substitute for morning toast. Seriously.
I’m giving you the recipe as Rosie has it in her book. That filling of hers is simply butter and confectioner’s sugar [icing sugar in Canadian English]. I thought the cookies deserved a filling with more punch, so Suzi and I used:
- 4 ounces of cream cheese
- ½ cup of heavy cream
- Enough powdered sugar to get to spreading consistency [I guess about a cup, I just kept spooning it in]
This filling has that cream cheese tang which is a delightful complement to the deep and dark cocoa flavor of the wafer. Either way, you’ll probably want to sandwich up half the cookies and keep the others “plain” for breakfast indulgence. It is wrong, you know, to eat sandwich cookies for breakfast. Very wrong.
The Homemade You-Know-What
Yield: 12 sandwich cookies
Ingredients:
For the cookies:
- 3 cups all-purpose flour
- ¾ cup dark cocoa
- 1 teaspoon baking soda
- ½ teaspoon salt
- ¼ teaspoon baking powder
- 1 ½ cups butter, room temperature
- 2 cups granulated sugar, plus extra
- for the cookie tops
- 2 large eggs
- 1 teaspoon pure vanilla
For the filling:
- 1 cup butter, room temperature
- 2 cups icing sugar
- 1 tablespoon pure vanilla
Preparation:
Preheat the oven to 350T.
Onto a large piece of parchment paper, sift together the flour, cocoa, baking soda, salt and baking powder. Set aside.
In a stand mixer fitted with a paddle attachment, cream the butter and sugar on medium to high speed until light and fluffy. Scrape down the sides of the bowl.
Add the eggs one at a time and beat briefly after each addition. Scrape down the sides of the bowl. Add the vanilla and beat again to combine. Scrape down the sides of the bowl again.
Turn the mixer to low and add the dry ingredients and mix until fully combined.
Use the ice cream scoop to drop 24 equally sized portions of dough onto the prepared cookie sheets, about 1 */2 inches apart. Fill a small bowl with granulated sugar. Press a drinking glass or flat-bottomed mug onto a dough portion to make the bottom of the glass a little sticky with dough. Dip the glass into the bowl of sugar to coat and then press down slightly onto the dough again to transfer the sugar. Repeat for each cookie until they are all topped with sugar.
Bake in the preheated oven for 15 to 17 minutes or until the cookies are firm around the edges but still slightly soft in the center. Remove from the oven and transfer the cookies to wire racks to cool completely.
Meanwhile, prepare the filling: In a stand mixer fitted with a paddle attachment, cream the butter and icing sugar on medium to high speed until pale in color. Add the vanilla, increase the speed to high and continue to cream until the filling is light and fluffy.
When the cookies have cooled, turn 12 of them bottom side up. Spoon 2 heaping tablespoons of filling onto each. Place the remaining cookies on top and press down lightly until the butter cream has spread to the edges of the cookies. Stack them high on a cake plate and holler for your friends and family.
Source: Butter Baked Goods by Rosie Daykin [Knopf 2013]
Photo Information [Top]: Canon T2i, EFS 60mm Macro Lens, F/3.5 for 1/30th second at ISO‑400
Photo Information [Bottom]: Canon T2i, EFS 60mm Macro Lens, F/8 for 1/200th second at ISO‑100