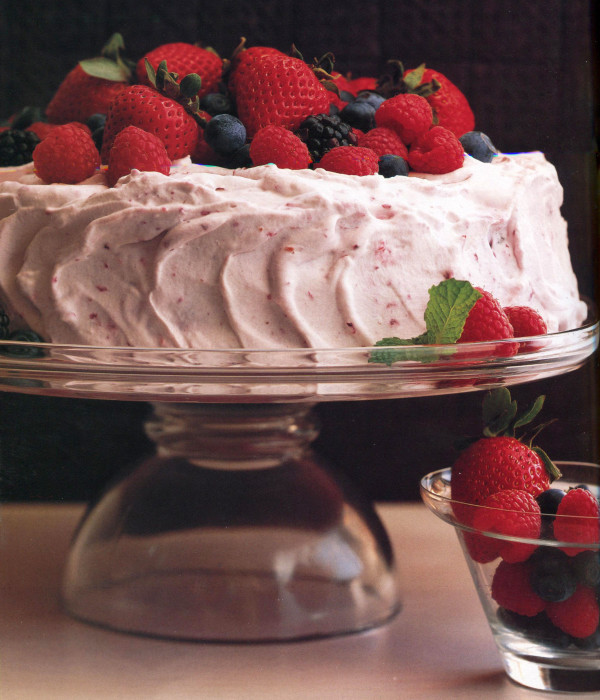
There are exceptions to every rule. I have a rule: never mix fruit and chocolate. Black Forest Cake? Please I hate it. I like fruit, I am addicted to chocolate, but the combination, for me, is ghastly.
And then there is this cake. On your store shelves are those boxes of Famous Chocolate Wafers by Nabisco. No, they don’t sell as well as the ubiquitous Oreos, but those wafers are wonderful. Millions of the icebox cakes are made each year with wafers and whipped cream.
Here, Abby Dodge in The Weekend Baker introduces berries and mascarpone cheese to forge a complex battery of flavors that work, first to your eye and then to in your mouth. The chocolate wafers are an unsurpassed foundation, and the berries and mascarpone blend perfectly. This cake is the exception to my rule. This cake is simply exceptional.
This one of the desserts Abby calls a “baking in stages” affair. It will take you a couple of days including the chilling time. So, make some space in your fridge, take your time, and enjoy every bite of wafer and berry and cheese.
If you like this dessert idea, wait until you see Abby's new book: The Everyday Baker. To be published on November 16, I'll be giving you an early cookbook review and some key recipes in advance. It's a great book. Great. And sweet, too!
Old-Fashioned Berry Icebox Cake
Yield: serves 12 [or fewer!]
Ingredients:
- 1 ½ pints blackberries, rinsed and well dried
- 1 cup granulated sugar
- 2 tablespoons orange juice or orange-flavored liqueur
- 2 teaspoons finely grated orange zest
- Pinch of table salt
- 12 large strawberries, rinsed, well dried, hulled, and cut into quarters
- 1 cup raspberries, rinsed and well dried
- 2 cups heavy cream
- 1 container (8 ounces/227 grams) mascarpone cheese
- 75 crisp chocolate wafers (about 1 1/2 boxes, 9 ounces/255 grams each, Famous Chocolate Wafers by Nabisco)
Preparation:
In a medium saucepan, combine the blackberries, sugar, orange juice or liqueur, orange zest, and salt. Set the pan over medium heat and cook, stirring frequently, until the fruit juices are released and the sugar is dissolved.
Set a strainer over a medium bowl and pour the fruit and juices into the strainer. Using the back of a spoon or a rubber spatula, press on the blackberries to force the pulp through the strainer. Remember to scrape the underside of the strainer to free the clinging pulp. Discard the contents of the strainer.
Add the strawberries to the hot mixture and, using a fork, press them against the inside of the bowl to crush them. Add the raspberries. This time, instead of crushing the berries, just press them gently against the bowl. Taste and add a little more sugar to sweeten the berries or a pinch more salt to bring out their flavors, if needed. Put the fruit mixture into the refrigerator and stir frequently until well chilled, at least 1 hour.
If you're in a rush, set the bowl into a larger, ice-filled bowl (see What Is It? below) and stir frequently until chilled.
Meanwhile, position the ring of a 9-inch spring form pan (don't use the bottom) on a flat serving plate. (Remember to make room in your fridge for the plate and pan.)
When the fruit mixture is chilled, pour the cream and mascarpone into a large bowl. Beat with an electric mixer (stand mixer fitted with the whisk attachment or handheld mixer) on medium-high speed until firm peaks form. Pour the fruit into the whipped cream and, using a rubber spatula, fold gently, but thoroughly, until blended. Measure out about ½ cup of the cream, cover, and refrigerate. (The extra cream is used to touch up the sides after unmolding.)
Spoon about 1 cup of the cream into the prepared pan (spring form pan ring and plate) and spread evenly. Beginning with the outer edge, arrange the cookies, flat side down and slightly overlapping, in a spiral pattern. Once the outer row is complete, continue with an inner ring of cookies that slightly overlaps the first row (15 cookies for each layer). Spread another 1 ⅓ cups of the cream over the cookie layer. Arrange a second layer of cookies over the cream. Repeat the layering of cookies and cream three more times, finishing with a layer of cream. Cover with plastic wrap and refrigerate for 1 day.
Before serving or up to 4 hours ahead of time, run a long, thin knife or metal spatula between the edge of the cake and the ring. Release the spring form clasp and lift off the ring. Using a small metal spatula or the dull side of a table knife, spread the reserved cream around the outer edge of the cake. Arrange the berries and mint leaves on top, if using.
To serve, cut into slices with a thin knife run under hot water and wiped dry, repeating the process for each slice.
Source: The Weekend Baker by Abigail Johnson Dodge [Norton, 2005]

