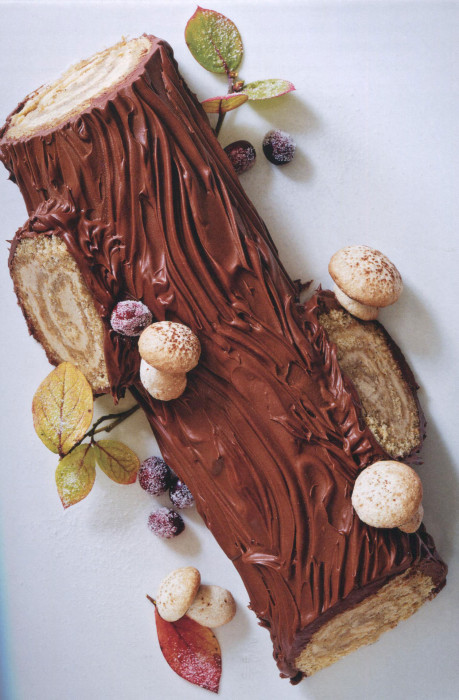
For many of us, there is one dessert that is cardinal to Christmas: Bûche de Noël. I could use a thousand words to attempt to describe this wonder, but the picture above is surely better than one or two or three thousand words.
This recipe and the lovely photo come from the marvelous Alice Medrich in her most recent book: Flavor Flours. There is no better authority for baking than Alice. She employs her experience and talent to fashion recipes that are perfect. Literally, perfect.
In the recipe below, I include references to different pages and recipes, the New Classic Buttercream, in Flavor Flours. I’m retaining them because, if you are to make this cake, I really suggest you have a copy of Flavor Flours sitting before you on the kitchen table. I don’t want to give away all of Alice’s secrets here. I do want to encourage you to add her volume to your library because you really need it, and it will give you years of dessert satisfaction.
The recipe, with those references, is presented here to give you the scope of the effort to make your own Bûche de Noël. It’s not a 30-minute project. And you can understand now why your local bakery may charge $50 or more for a small Bûche de Noël. Alice’s version is not small and will serve a holiday table surrounded by a dozen people.
This is a grand dessert and one that I can understand you’ll do only once a year. Alice’s recipe is long because this truly is a complicated project. However, Alice’s lengthy instructions will carry you through from flour to frosting. You can, with a patient hand, produce something that looks like that photo, probably with your own unique interpretation of tree bark.
Pick up a copy of Flavor Flours. Look at this recipe, and the others, and really consider taking this masterpiece book home. Do yourself a Flavor Favor.
Chestnut Bûche de Noël
Yield: serves 12 to 14
Ingredients:
For the cake:
- 4 tablespoons Clarified Butter (page 335) or ghee (see page 38)
- 1 ¼ cup chestnut flour
- ¾ cup sugar
- 5 large eggs
- Generous ⅛ teaspoon salt
For the syrup:
- 2 tablespoons sugar
- 2 tablespoons bourbon, brandy, or rum
- 1 tablespoon plus 2 teaspoons water
For the filling and frosting:
- 7 ounces 55% to 62% dark chocolate, coarsely chopped
- ¼ cup water
- 2 cups New Classic Buttercream (page 348)
- ½ cup chestnut spread (sweetened chestnut puree), or more to taste
Other components and equipment:
- Chestnut Meringue Mushrooms (page 219) for decoration (optional)
- A few raw cranberries rolled in sugar for decoration (optional)
- 16-by-12-by-1-inch half sheet pan or 11-by-17-inch jelly roll pan
Preparation:
Position a rack in the center of the oven and preheat the oven to 350°F. Line the bottom of the pan with parchment paper.
Put the clarified butter in a small pot or microwavable container ready to reheat when needed, and have a 4- to 5-cup bowl ready to pour it into as well—the bowl must be big enough to allow you to fold some batter into the butter later.
Whisk the flour and 2 tablespoons of the sugar together thoroughly in a medium bowl.
In the stand mixer fitted with the whisk attachment, beat the eggs, remaining sugar, and salt at high speed for 5 to 6 minutes. The mixture should be light colored and tripled in volume, and you should see well-defined tracks as the whisk spins; when the whisk is lifted, the mixture should fall in a thick, fluffy rope that dissolves slowly on the surface of the batter.
Just before the eggs are ready, heat the clarified butter until it is very hot and pour it into the reserved bowl.
Remove the bowl from the mixer. Sift one-third of the flour over the eggs. Fold with a large rubber spatula until the flour is almost blended into the batter. Repeat with half of the remaining flour, then again with the rest of the flour. Scrape about a quarter of the batter into the bowl of hot butter. Fold until blended. Scrape the buttery batter over the remaining batter and fold just until blended. Scrape the batter into the pan and spread it evenly with an offset spatula, using as few strokes as possible to avoid deflating the batter.
Bake for 10 to 15 minutes, or until the top is golden brown and springs back when pressed gently with your fingers. Set the pan on a rack to cool completely before filling.
Meanwhile, make the syrup by combining the sugar, spirits, and water in a small jar or bowl. Stir, cover, and let stand to dissolve the sugar, at least 15 minutes or until needed.
Run a knife around the edges of the pan to detach the cake. Cover the cake with a sheet of wax paper and set a baking sheet on top, hold the pan and sheet together, and flip them over. Remove the pan and peel the parchment off the sponge. Cover the cake with a sheet of foil, top with the pan and flip the whole business over again, and remove the baking sheet. The cake should be right side up on the foil, in the pan. Use the foil to lift or slide the cake onto the counter.
Brush the cake with the syrup to moisten it slightly.
Place the chocolate and water in a stainless steel bowl and set it directly in a wide skillet of barely simmering water. Stir frequently until the chocolate is melted and the mixture is smooth. Let the chocolate mixture cool to lukewarm and stir it into 1 cup of the buttercream. Cover and refrigerate the chocolate buttercream (or freeze it in an airtight container) until you are ready to frost the cake.
Stir the chestnut spread into the remaining cup of buttercream.
Spread the chestnut buttercream evenly over the cake. Start rolling the cake at one short end by folding the edge about 'A inch over the filling and continue to roll the cake, using the foil beneath it to help. Roll the cake gently but tightly, as though it were a sleeping bag, keeping the roll as cylindrical as possible. When the roll is complete, wrap it tightly in foil and freeze until hard, or at least firm (the firmer the cake, the easier it will be to decorate). The cake may be completed to this point, and kept frozen for up to 2 months.
To finish the cake, soften and stir the reserved chocolate buttercream, as directed on page 349, until it is smooth and creamy. It should be very soft so it doesn't set immediately when you spread it on the frozen cake. If necessary, set the bowl in warm water and stir for just a few extra seconds, until the consistency is right.
Unwrap the cake and trim a fraction of an inch from each end to even them. Set the cake on a decorating turntable or a baking sheet. Have a plastic fork (if possible) ready to texture the buttercream and two regular dinner forks ready to transfer the bûche to a serving platter.
Use a spatula to spread the log lavishly with chocolate buttercream, reserving at least a couple of tablespoons. Immediately (before the buttercream starts to stiffen) rake the plastic fork through the buttercream so that it resembles the texture of tree bark. Dip a large sharp knife in hot water, wipe it dry, and cut a "stump," at a slant, from each end of the log. Set the stumps aside. Slip the dinner forks under the log—one near each end—and then lift it and transfer it to a serving platter. Position the stumps against the cake on either side, slanted sides facing out. Cover any bare spots and gaps between the stumps and the cake with the reserved buttercream and use the plastic fork to touch up the "bark" effect as necessary.
If you like, decorate the cake with fresh sprigs of greenery, meringue mushrooms, and sugared cranberries. Unless you have a covered container that will fit it, refrigerate the cake uncovered until the buttercream is set, and then wrap the whole platter gently with plastic wrap. For the best flavor, texture, and appearance, remove the cake from the refrigerator (and remove the plastic wrap) at least an hour before serving. The cake keeps, covered and refrigerated, for 3 or 4 days.